Configure Translator App
For additional support, create a ticket
This add-in creates machine translations of any compatible document, page, or item in your libraries and lists, into any or all of the languages of your site.
It is intended to work with PointFire Translator Server if it is installed and configured, but if not it will attempt to use SharePoint Online's or SharePoint 2019's built-in Machine Translation Service, much slower and lower quality. For more information on installing and using the app, see PointFire Translator
PREPARATION
The PointFire Translator app can be installed on each workstation of those who will use it, in which case SSL is not required, or it can be shared on a single server, in which case SSL is mandatory. The non-SSL version of PointFire Translator uses port 33080, the SSL version uses port 33443. The host name that it uses, whether with SSL or without, does not need to be routable with public DNS, almost any host name can be used. That will not work from outside the intranet, for example with Power Automate.
The PointFire Translator manual has more details on configuring SSL, but for testing purposes if you would like to create a self-signed SSL certificate and install it on port 33443, you can use the “MAKECERT.PS1” script . Since this is a self-signed certificate, other workstations won’t recognize it automatically. You can use the “ROOTCERT.PS1” script and the generated file PointFire.cer to install this certificate root on other workstations.
PointFire Translator server communicates via TCP on port 33080 or 33443. These ports are typically blocked by default rules on network and server firewalls. If the server is using Windows Firewall, you will need to create inbound rules to open those ports, using Microsoft Management Console or netsh. If the server is an Azure VM, you will also have to go to the Azure Portal on the VM's Networking tab to add inbound port rules for those two ports.
INSTALLATION
Before the PointFire Translator App can be used on a SharePoint Online site, it is essential to register it and grant it the necessary permissions through the Azure Active Directory portal corresponding to the SharePoint Online tenancy.
The simplest way to do this is to using the “AppReg.ps1” script. This script will register the PointFire Translator server for use with the PointFire Translate app, and will also carry out the steps to use it with Power Automate. The script will log in once to register and request permissions, and a second time to grant the permissions. If you wish to re-run the script after successfully registering the application, you will need to delete the “PointFire Translator” application in AzureAD. The appropriate PointFire Translator app configuration parameters are saved at the tenant level in SharePoint, there is no need to set those parameters at the site level unless you want to override the tenant-level parameters.
To accomplish this registration manually instead of using the script, navigate to https://portal.azure.com/ and click on "App Registrations", then click on "New registration" (or select the existing registration) It should allow only accounts within this tenant A sample registration is shown below.
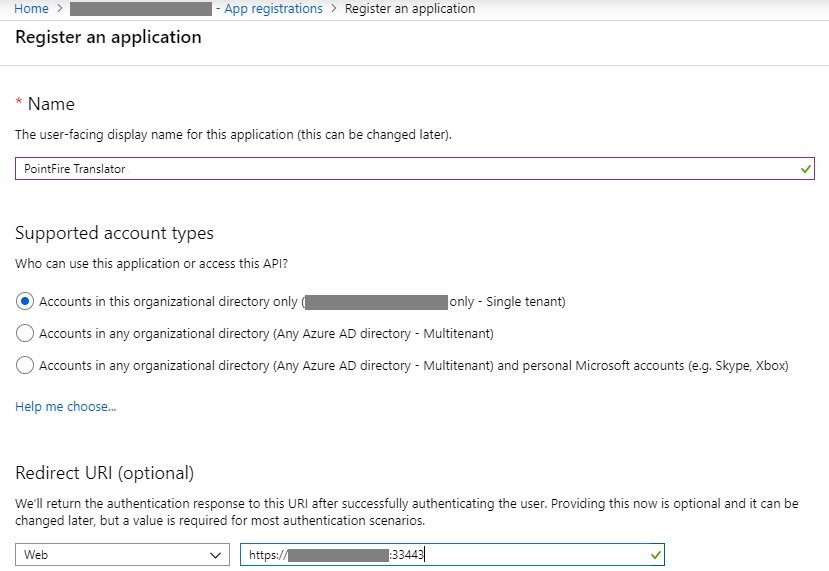
The name of the registered application is optional. The Redirect URI is mandatory, and it must be either http://localhost:33080 , https://localhost:33443 or the https URL of the PointFire server. Multiple URLs are allowed in case different sites use different URLs. If it is going be used for the PointFire app, then the URL can be one that is only resolvable and reachable within the local network, because commands originate from local browsers. However the Power Automate interface requires a public URL, since those commands originate from a Microsoft data centre.
The next step is to add a client secret, as shown below.
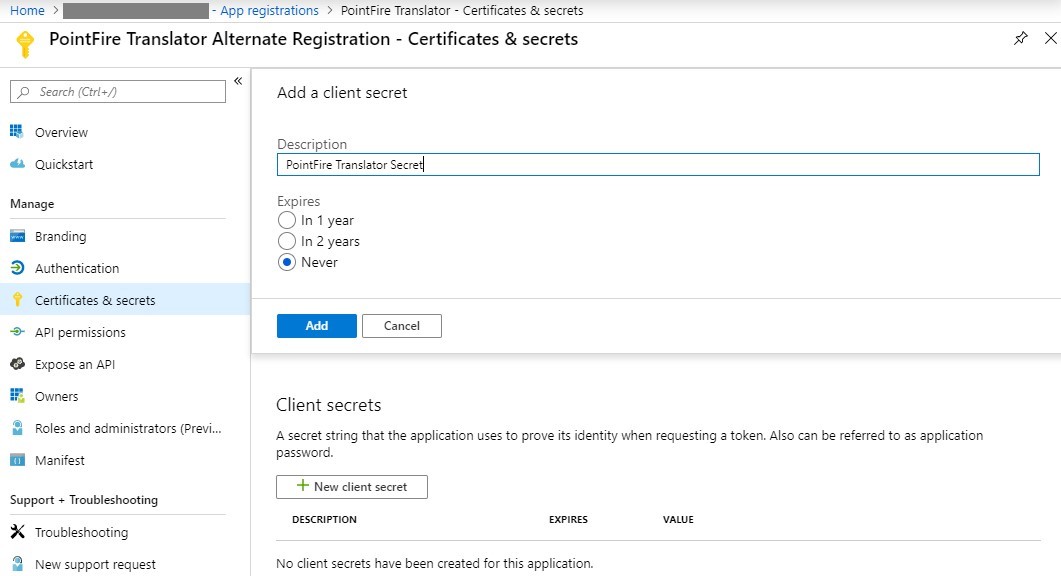
Note down the client secret, as it will be required later.
Third, it is necessary to enable specific SharePoint-related permissions for the newly registered application. Select "API permissions" then "Add a permission", click on SharePoint, then select "Delegated permissions" These permissions are AllSites.FullControl, MyFiles.Read, MyFiles.Write and Sites.Search.All, as shown in the screen shot below.
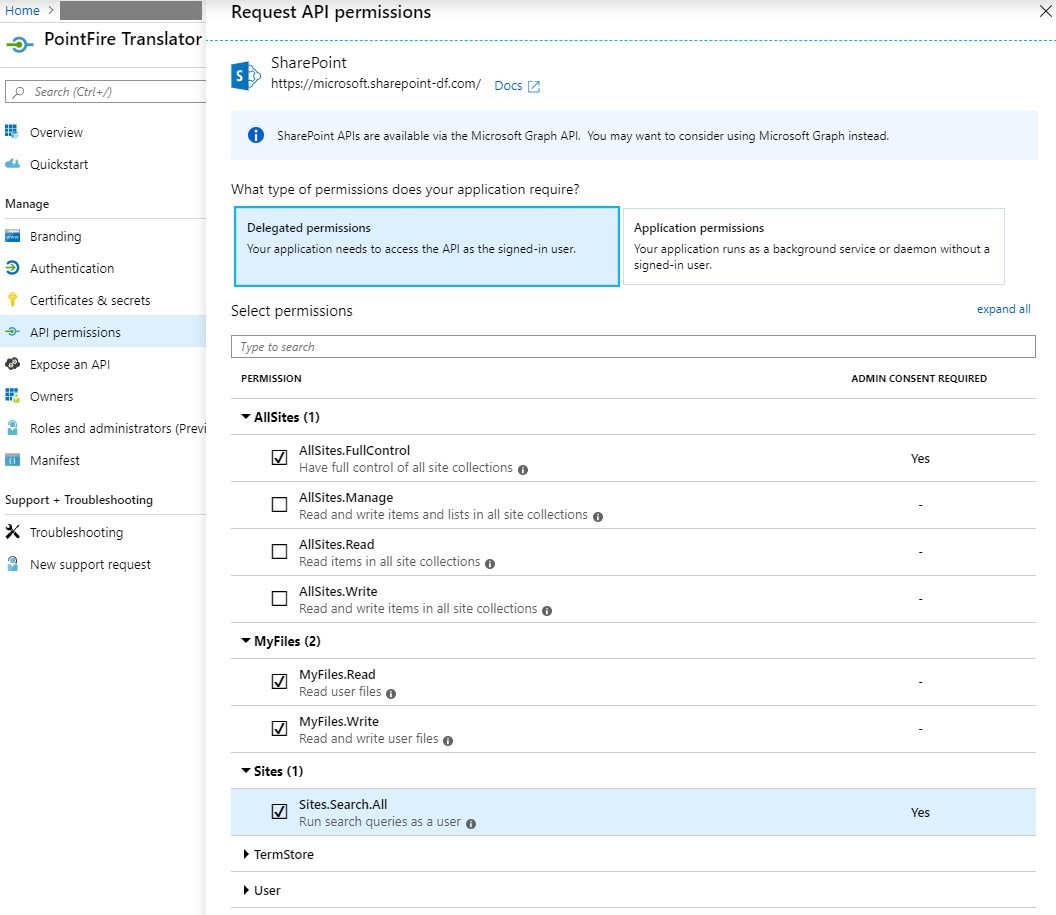
Note whether any of the permissions say "Yes" under "Admin consent required", if that is the case then after permission have been saved then click on "Grant admin consent for (organization name)", or ask an administrator to grant the permissions on behalf of the organization.
Finally, it is also necessary to enable the Implicit grant permission for access tokens for the application. This permission, shown in the screenshot below, is required in order for the PointFire Translator app to be able to request an access token that can be used by PointFire Translator Server, connecting to SharePoint from another host.
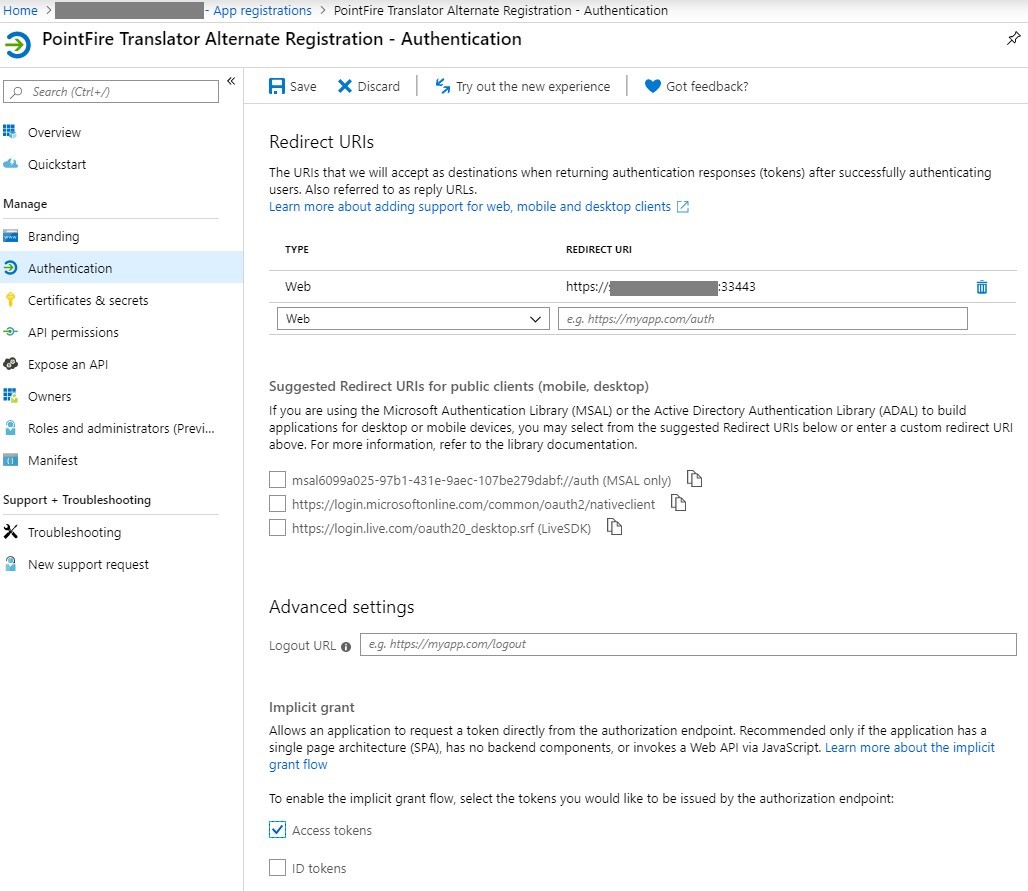
Under "Implicit grant" check "Access tokens".
SHAREPOINT APP POST-INSTALLATION CONFIGURATION
Before the PointFire Translator app can be used, it must be configured, using the same parameters that were used to set up the app via the Azure Portal.
Visiting the app page directly (not through the context menu after selecting a document or other SharePoint item) leads to the following content being shown:
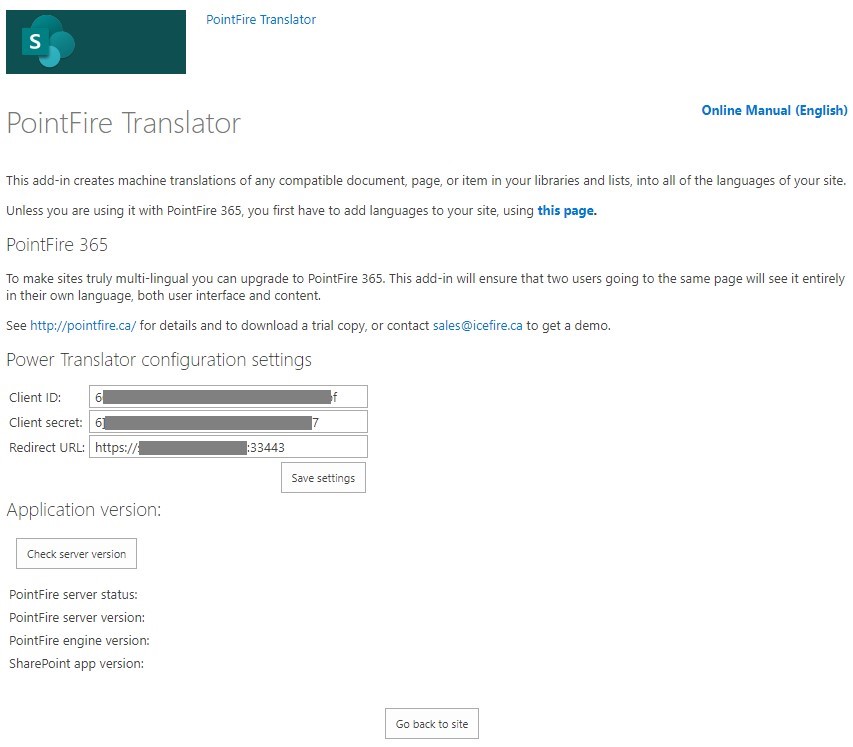
Note that the Translator Server configuration settings appear only if the user is a site administrator. The three fields in this section must be populated with the Client ID, Client secret and Redirect URL, exactly as they appeared in the Azure Portal, unless they have already been set at the tenant level. After clicking Save settings, a green checkmark indicates if the settings were saved successfully. At this point, the PointFire Translator app is ready for use.
The Check server version button can be used to verify basic connectivity after the Redirect URL parameter has been set. It attempts to contact the designated PointFire Translator server (as defined in the Redirect URL above) and, if successful, shows the version number.
